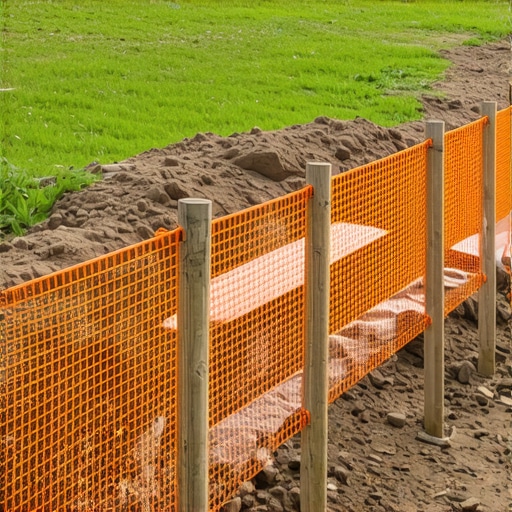
Why Your Site Needs a Silt Fence Before the First Shovel Hits
I remember the moment I underestimated the importance of setting up a silt fence before my first site excavation. Dirt was flying everywhere, and mud was washing onto neighboring properties the very first rain—my project turned into a muddy mess, and I realized I had made a rookie mistake. That lightbulb moment made me vow to never start a construction phase without proper sediment control in place.
The Hidden Cost of Ignoring Sediment Control
It’s easy to focus on the visible aspects of a build—materials, permits, design details—but one of the most overlooked yet crucial elements is installing a silt fence before you even dig. Not installing one upfront can lead to significant issues like environmental fines, project delays, and damage to your reputation. Believe me, I learned this the hard way, and I want to save you from making the same mistake.
Is Installing a Silt Fence Overhyped?
Many skeptics argue that silt fences are just a regulatory hoop, and some contractors might skip them to save costs. However, neglecting this simple barrier can backfire spectacularly, leading to erosion, sediment runoff into waterways, and hefty penalties. According to the Environmental Protection Agency, improper sediment control is a leading cause of water pollution from construction sites. So, if you’re aiming for a smooth project, installing a silt fence must be part of your initial site plan.
My mistake was assuming that my excavation wouldn’t be messy or that I could handle runoff later. But in reality, sediment control should be considered the foundation of any sustainable and compliant construction effort. If you’re planning a new build or site addition, now’s the time to integrate sediment barriers to avoid costly cleanup and potential legal issues.
Next, we’ll explore how to determine the right type of silt fence for your project and the step-by-step process to install it correctly. Ready to steer clear of muddy pitfalls? Let’s dive in.
Choose the Right Silt Fence Material and Location
Start by selecting a durable sediment control barrier suitable for your site’s conditions—preferably a non-woven geotextile fabric that traps soil effectively. Locate the fence along the contour of your land, extending beyond the disturbed area to prevent runoff from reaching neighboring properties. Recall the time I installed a silt fence on a sloped site; placing it improperly led to sediment escape, teaching me the importance of correct positioning right from the start.
Prepare the Ground for Installation
Clear debris and vegetation from the fence line to ensure solid soil contact. Excavate a shallow trench, about 4-6 inches deep, along the marked line where the fence will sit. This trench anchors the fabric and prevents it from shifting or tumbling during heavy rain. I once overlooked trenching on a project, and the fence was easily displaced, resulting in sediment leakage—making this preparatory step essential.
Embed the Fabric Properly
Secure the fabric into the trench by folding the top edge into the trench and backfilling with soil, ensuring at least 6 inches of fabric are buried underground. Stakes or fence posts should be driven into the soil at roughly 10-foot intervals, attaching the fabric tautly to prevent sagging. During my last installation, precise attachment prevented fabric elongation and maintained effectiveness through multiple storms.
Ensure Consistent and Proper Tension
Pull the fabric tight when securing it to the stakes to avoid slack. Loose fabric creates a conduit for sediment escape, especially during heavy rainfall. Think of this like straining a net tightly—everything stays in place, and sediment gets caught effectively. I learned this lesson after a loose fence failed to contain runoff during a sudden downpour, emphasizing the value of proper tension.
Inspect and Maintain Regularly
Check the silt fence after each storm for tears, displacements, or accumulated sediment overriding the barrier. Remove sediment buildup on the windward side to maintain the fence’s effectiveness, and repair any damage immediately. Consistent maintenance was the difference between a functional barrier and one that failed, leading to unintended sediment runoff and potential fines.
Know When to Remove the Fence
Remove the silt fence only after final site stabilization—once the disturbed area is permanently stabilized with vegetation or other erosion controls. Leaving it too long can be unnecessary and hinder site work, while removing it prematurely may cause erosion issues. This balance is crucial and requires close monitoring of your site’s progress, just as I did when I personally removed a barrier after confirming the soil’s stability.
When it comes to estimating costs, permits, and planning for new builds or additions, many seasoned professionals fall prey to misconceptions that can sabotage their project budgets and timelines. Let’s dig deeper into some of these nuances that often go unnoticed by even the most experienced, and how recognizing them can save you time and money.
Why Relying on Averages Can Be a Costlier Mistake Than You Think
Many contractors and homeowners default to using industry averages or past project costs as a baseline for estimates. However, this approach overlooks site-specific factors such as soil conditions, local permit complexities, and unique design elements. For example, a previously estimated slab foundation cost might not account for a soil expansion risk—an oversight highlighted in studies emphasizing site-specific geotechnical assessments (see here). Overestimating or underestimating these nuances leads to budget swings, and the rule of thumb isn’t as reliable as precise, detailed estimates.
Misunderstanding Permit Processes Can Delay Your Entire Project
Many assume that permits are just a bureaucratic hurdle that can be rushed or bypassed—this is a dangerous myth. Permitting involves detailed site reviews, zoning compliance, and often, nuanced requirements like tree protections or setback adjustments. A mistake here can result in costly delays or denial, requiring re-submission and additional fees. For deeper insights, explore this comprehensive guide. Failing to understand local permit nuances can mean waiting months, or even having your project halted indefinitely.
Advanced Tip: How to Avoid Underestimating Low-Impact but Costly Changes
A common trap involves underestimating the impact of changes during construction, such as adding a major electrical upgrade or rerouting plumbing. These seemingly small modifications can trigger permit re-approvals, cause design revisions, or require additional inspections—each adding substantial costs. A proactive approach includes early coordination with engineers and permit officials—don’t wait for the change order to discover it will blow your budget. Check out this guide for tips on managing changes efficiently. The key is recognizing that initial estimates should include contingencies for unforeseen modifications; otherwise, the project risks spiraling out of control.
Have you ever fallen into this trap? Let me know in the comments! Remember, mastering these hidden nuances requires experience, but with diligent planning and expert insight, you can avoid most pitfalls and keep your project running smoothly.
Keep Your Gear in Top Shape: Essential Maintenance Tips
As a seasoned builder, I can’t stress enough how equipment maintenance directly impacts project timelines and quality. Regularly inspecting and servicing your tools—such as laser levels, drills, and measuring tapes—can prevent costly breakdowns. I personally solidify this habit by creating a maintenance schedule at the start of each project, checking critical components weekly. For precision tools like laser levels, ensuring their calibration remains accurate is vital; I use manufacturer-specific calibration kits every few months, which vastly improve measurement reliability and reduce errors on-site.
Investing in quality maintenance extends the lifespan of your equipment, saving you money and downtime over the years. When tools are well cared for, they perform more reliably, which boosts overall efficiency. Future trends indicate that smart tools with IoT connectivity will soon offer real-time diagnostics and automated maintenance alerts, further reducing manual check-ins. Staying ahead involves embracing these innovations early, preparing your team for seamless integration.
How do I maintain my tools over time?
Implementing routine cleaning, proper storage, and regular inspections are foundational. Labeling toolkits for different site sections or team members ensures everyone handles maintenance appropriately. Additionally, establishing relationships with certified repair technicians can help you troubleshoot issues before they escalate. For example, in my experience, scheduling quarterly professional checks on power tools prevents sudden failures that could delay critical tasks. Moreover, documenting each maintenance activity improves accountability and aids in tracking tool performance, which is invaluable when planning replacements or upgrades.
To enhance your maintenance regime, consider adopting digital asset management software that tracks tool history and sends reminders. This approach minimizes oversight and guarantees your equipment remains reliable throughout the project’s lifecycle. For comprehensive guidance on estimating ongoing maintenance costs and planning for equipment upgrades, explore this resource.
Remember, maintaining your tools efficiently not only preserves your investment but also ensures smooth operations as your projects scale. Get started today by selecting one high-quality tool and develop a dedicated maintenance plan around it—your future self will thank you for it!
Lessons That Changed My Approach to Construction Estimating and Permitting
One of the most pivotal lessons I learned was that overlooking the details of sediment control, permit intricacies, or site-specific factors can transform a straightforward project into a costly nightmare. The importance of comprehensive planning, from selecting the right silt fence material to understanding local permit nuances, cannot be overstated. These experiences taught me that meticulous attention to these elements is what separates a smooth build from one plagued with delays and budget overruns.
Another insight I gained centers around the misconception that industry averages are sufficient for accurate estimates. In truth, every site has its unique challenges—soil conditions, environmental restrictions, and local ordinances—that demand tailored assessments. Recognizing and incorporating these specifics early on can save you from underestimating costs or facing unexpected hurdles during construction. For detailed strategies on refining your estimates, I recommend exploring this resource.
Lastly, understanding the permitting process isn’t just about paperwork—it’s about proactively engaging with local authorities, understanding their expectations, and preparing your submissions accordingly. This proactive stance prevents costly rejections and delays, ensuring your project stays on schedule. To deepen your knowledge, check out this guide on navigating permits with confidence.
Insider Wisdom for Construction Success
- Don’t Rely Solely on Past Projects: Every site is different. Trust your site assessments and geotechnical reports over generic estimates to prevent surprises.
- Build Relationships with Permitting Officials: Open communication smooths the approval process and helps you anticipate requirements.
- Plan for Contingencies Early: Unexpected site conditions or permit delays can derail schedules if not accounted for from the start.
- Prioritize Site-Specific Sediment Control: Ignoring this can lead to environmental fines and project setbacks—it’s worth the extra effort.
Where to Find the Tools That Make a Difference
- Construction Edge Estimating Software: Trusted for its accuracy and ease of use, it helps tailor estimates to your specific site conditions. Learn more about this tool.
- Permitting Checklists and Templates: Streamline your permit applications with comprehensive templates that cover all necessary details. See this guide.
- Site Assessment Guides: Use detailed checklists to evaluate soil, drainage, and environmental factors before estimating or planning.
Your Next Step in Construction Excellence
Every project is an opportunity to learn and improve. By integrating these tailored insights into your planning, you’ll not only avoid common pitfalls but also build with confidence. Remember, construction estimation and permitting are just the start—mastering these elements opens the door to smoother projects and satisfied clients. Embrace the details, and watch your success grow!
Have you encountered surprises during site assessments or permit approvals? Share your experiences in the comments below—I’d love to hear how you navigated those challenges.