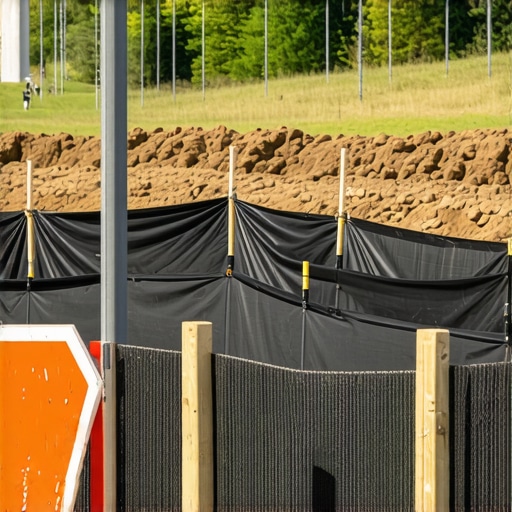
Why Your Site Must Have a Silt Fence During Excavation
I remember the first time I overlooked installing a silt fence before starting excavation on a small backyard project. It was a humid Thursday afternoon when a sudden rainstorm turned my muddy work zone into a mini floodplain. My neighbor’s driveway got covered in silt and debris, and I felt a sinking pit in my stomach. That lightbulb moment made me realize how crucial proper erosion control methods are—especially the humble silt fence.
The Hidden Cost of Skipping a Silt Fence
Many homeowners and even seasoned contractors underestimate the importance of installing a silt fence. They see it as just another step or an optional accessory. But the truth is, neglecting this simple barrier can lead to severe environmental fines, costly cleanup, and even legal trouble if soil erosion causes damage to neighboring properties. My early mistake taught me that overlooking erosion control can turn a straightforward project into a stressful mess, both financially and environmentally.
Research by the EPA shows that without proper controls, construction sites can send sediments into waterways, causing pollution and harming aquatic life. Implementing a silt fence is a proactive step—saving you from avoidable costs and penalties.
Will a Silt Fence Really Make a Difference?
This is a common skepticism I encounter. Some believe that other measures like proper grading or watering the soil are enough. I used to think the same—until a heavy rain revealed that soil had washed onto the street, clogging drains and causing a mini flood. I learned that a well-installed silt fence acts as a reliable barrier, trapping sediments before they reach storm drains or neighboring land.
In the next section, I’ll guide you through the essential reasons why a silt fence isn’t just recommended but necessary during excavation. If you’ve faced similar issues or want to avoid them altogether, read on to see how this simple step can save your project and your peace of mind.
Prepare Your Site for Silt Fence Installation
Start by assessing your project area to identify the downhill slope where erosion is most likely to occur. Remove any debris or obstacles that could hamper fence placement. Mark the perimeter where water runoff will flow, ensuring the fence will intercept sediment before reaching storm drains or neighboring properties — a simple yet effective approach I used during my backyard project to prevent muddy runoff.
Gather Materials and Tools
You’ll need stakes, silt fencing fabric, hammer or post driver, measuring tape, string, and a trowel. Using quality materials ensures durability during storms. During my recent build, investing in heavy-duty stakes and UV-resistant fabric saved me from frequent repairs and replacements, keeping the project on track and within budget.
Plan the Fence Path and Stake Placement
Lay out the route of the fence with string, curving around the project area as needed. Place stakes approximately 8-10 feet apart along the line, ensuring they’re driven deep enough to withstand wind and water pressure. Visualize the fence as a barrier blocking the muddy flow, much like a dam holding back water—precision here prevents weak spots that can fail in a storm.
Install the Silt Fence
Drive stakes into the ground at a slight angle for stability. Attach the fabric to the stakes, ensuring the fabric’s bottom edge extends into the soil by 4-6 inches to prevent sediment from flowing underneath. Pull the fabric taut to avoid sagging, similar to tightening a tent, which prevents water pooling and reduces stress on the fence during heavy rain.
Secure the Fabric Properly
Stake down the fabric, folding it into the prepared trench or burying the bottom edge into the soil for added security. Backfill the trench carefully to lock in the fabric. At my site, I used staples and weights to keep the fabric in place during installation, avoiding future sagging that could compromise the barrier’s integrity.
Address Bridges and Edges
Ensure the fence is continuous across the site, sealing any gaps or overlaps. Use additional stakes or panels at corners and transitions. During a recent project, I added extra stakes at low spots to prevent water from bypassing the fence, which proved crucial during unexpected downpours.
Inspect and Maintain Regularly
After installation, check the fence after each rain and after strong winds. Repair any tears or displaced stakes immediately. During my experience, quick fixes after a storm kept the sediment trapped and avoided larger cleanup later.
Remove the Fence Once Work is Complete
Once the project near completion, carefully remove the fence, restoring the original landscape as necessary. Dispose of the fabric responsibly or recycle if possible. When I removed my fence, I rolled and stored the fabric for future projects, saving money and reducing waste—an eco-friendly finishing touch that fosters responsible construction practices.
For more guidance on managing your construction site effectively, consider consulting experts at Construction Edge. Proper installation of silt fences is a foundational step in ensuring your project remains environmentally compliant and avoiding costly fines or cleanup efforts.
 While many believe that estimating costs, managing permits, and planning a new build or addition are straightforward tasks, the reality is far more intricate. A common myth is that using average square footage costs or standard permit checklists guarantees accuracy. However, this approach often overlooks critical nuances that can lead to significant budget overruns or project delays.
One of the most overlooked aspects is the variability introduced by local building codes and regional conditions. For example, soil stability and climate can drastically change foundation costs, yet many estimators neglect these factors, assuming generic costs apply everywhere. According to a study published in the *Journal of Construction Engineering*, regional climate variations can cause up to a 20% difference in foundation and framing costs, emphasizing the importance of localized data in estimates. You can explore more accurate strategies in [new build estimation techniques](https://constructionedgez.com/mastering-new-build-estimating-essential-tips-for-success).
A common trap I’ve seen is relying solely on digital tools or software estimates without cross-verifying with actual local data or recent bids. This oversight can create discrepancies between projected and actual costs. For instance, supply chain fluctuations and material availability are often underappreciated, leading to budget surprises. It’s crucial to incorporate current market conditions into your estimates, which can be achieved by consulting recent supplier quotes or local contractors. Check out [estimating strategies for accurate project budgets](https://constructionedgez.com/top-estimating-strategies-for-accurate-project-budgets) for deeper insights.
An advanced consideration that often trips up even experienced estimators is permit complexity. Many assume that permit acquisition is a bureaucratic hurdle easily navigated with a standard application. In reality, permits can involve detailed site plans, environmental assessments, or special variances, all of which add costs and time. A savvy estimator anticipates these additional requirements and includes buffer margins accordingly. A detailed walkthrough is available in [navigating permit requirements for additions](https://constructionedgez.com/navigating-permit-requirements-for-additions-in-2025). Recognizing permit intricacies prevents costly delays and project hold-ups.
What are the biggest pitfalls hidden in estimating and permission procedures that untrained eyes often miss?
The most insidious mistake is underestimating the influence of site-specific challenges, like underground utilities, drainage issues, or existing structures. These factors often require redesigns, extra permits, or specialized labor, which can rapidly inflate costs if unanticipated. Being proactive by conducting thorough site surveys or employing experts can mitigate these surprises. For example, [cost-effective estimating techniques](https://constructionedgez.com/cost-effective-estimating-techniques-for-new-builds-and-additions) illustrate ways to incorporate these hidden costs effectively.
In summary, successful project planning relies heavily on understanding regional specifics, current market dynamics, permit complexities, and site conditions. Do not fall into the trap of oversimplification—your project’s success depends on your ability to dig beneath the surface.
Have you ever fallen into this trap? Let me know in the comments.
How do I keep my construction tools and systems in top shape over time?
Maintaining your construction equipment and management systems is crucial for consistent quality and efficiency. I personally swear by scheduled inspections and a regular cleaning routine—this prevents breakdowns and extends the lifespan of essential gear like rotary hammers, laser levels, and digital plan readers. For instance, I use a lithium grease for my laser tripod joints every few months, which has significantly reduced calibration issues. Investing in high-quality, durable tools is also vital; I recommend tools with rubberized grips and sealed motors, like the Bosch GLL3-330C laser level, which I rely on for its robustness and precision during every project. Prediction: As technology advances, I foresee a rise in smart tools equipped with IoT sensors that notify you when maintenance is due, reducing downtime even further.
How do I maintain my systems for estimating and project management?
In my experience, integrating specialized software like Buildertrend or CoConstruct is indispensable. These platforms allow you to set regular data backups, update workflows, and troubleshoot issues proactively. For example, I schedule weekly syncs and updates to ensure my project estimates align with current market prices—this is especially important given fluctuating material costs. Additionally, integrating cloud-based storage ensures data safety and easy access from multiple devices, which keeps the project moving regardless of on-site or remote work. A recent trend I believe will dominate is the adoption of AI-powered analytics that monitor project progress and suggest adjustments, keeping projects on track and under budget. To stay ahead, I recommend setting up routine maintenance checks for your software subscriptions and hardware integrations, much like you’ll care for your physical tools. You can learn more about precise estimating by exploring estimating techniques for home additions. Don’t wait until tools break—try implementing a quarterly review of your equipment and digital systems to keep everything in optimal condition and maximize your project’s success.
Hidden Pitfalls That Caught Me Off Guard
One of the most eye-opening lessons I learned was the importance of factoring in regional permit complexities early in the project. I once underestimated the time and costs involved in securing all necessary approvals, which led to delays and budget overruns. Recognizing the unique requirements of local authorities saved me from similar surprises on subsequent projects, emphasizing the value of thorough research upfront.
Another unexpected insight was how quickly market fluctuations in material prices can affect my estimates. Relying solely on historical data proved risky; actively monitoring recent bids and supplier quotes became essential for accuracy. This habit not only improved my budgeting but also built trust with clients, showing I was a reliable professional.
Lastly, I discovered that site-specific conditions, like soil stability or underground utilities, can dramatically alter foundation and framing costs. Conducting comprehensive site surveys or consulting experts beforehand prevented costly redesigns or permit issues down the line. These experiences underscored that meticulous planning and local knowledge are non-negotiable for successful estimating and permitting.